Exploiting Old iDRACs in 2023
Exploiting iDRACs is a common practice in pentests as compromising one allows to also compromise the system controlled by the iDRAC. However, it is not so immediate to exploit old iDRAC versions nowadays as it was some years ago.
Getting access to iDRAC’s web interface
The easiest way to access the iDRAC panel is when it uses the default credentials “root:calvin”. If you are that lucky you can skip to the next point.
If the system does not use the default credentials or you can not guess them, you can try the exploits released during the last years, depending on the iDRAC version.
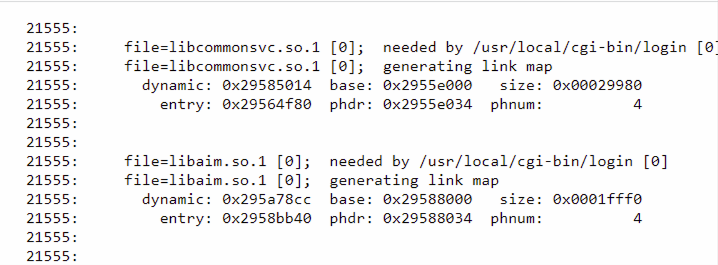
In my case I found a system vulnerable to CVE-2018-1207. It is really fast to find if an iDRAC is vulnerable to this exploit, check if you see something like this in the path “/cgi-bin/login?LD_DEBUG=files”:

To exploit this code injection vulnerability (CVE-2018-1207) you can use this Github repository or this one. You probably have to update the compilation line in any of them, changing “sh4-linux-gnu-gcc-7” or “sh4-linux-gnu-gcc-11” for the one used in your system. If run successfully, you will get a connection as root so you can add new users to the iDRAC service using racadm.
First, we must find an empty user “index”, that is, that no user already created is using. Index 2 is used by default so we will use number 4:
racadm getconfig -g cfgUserAdmin -i 4
It seems empty:

So we will add a new admin user to the iDRAC interface with:
racadm config -g cfgUserAdmin -o cfgUserAdminUserName -i 4 USERNAME
racadm config -g cfgUserAdmin -o cfgUserAdminPassword -i 4 PASSWORD
racadm config -g cfgUserAdmin -o cfgUserAdminPrivilege -i 4 0x000001ff
racadm config -g cfgUserAdmin -o cfgUserAdminEnable -i 4 1
We can use these credentials to access the web interface.
Access through Virtual Console
Having an admin user we can access the iDRAC web interface and launch the Virtual Console to control another system, most of the times I found Windows systems.

If you click “Start virtual console” a “viewer.jnlp” file is downloaded:

To open it, we need to use Java, specifically the javaws.exe binary. So first, install Java

Nice, Java is installed in C:\Program Files (x86)\Java\jre1.8.0_361:

If we try to open “viewer.jnlp” now, we will get and error:

But it is because of Java! We can access! Let’s see how.
It is time to open the Java control panel, go to “Security” and add the address of the iDRAC server:

Next we will open lib\security\java.security inside our Java folder. In my case, it is “C:\Program Files (x86)\Java\jre1.8.0_361\lib\security\java.security”. Open it as administrator or copy the file to your desktop and copy it back after modifying it.
We will comment two lines, the one starting with “jdk.jar.disabledAlgorithms=” and the one with “jdk.tls.disabledAlgorithms=”, and save the file:


Now if we try to connect we should be able to! If you still have Java errors, check this video: https://www.youtube.com/watch?v=OSsuqMSBnwQ.
Compromising the Windows system
Then we will follow the steps in Dell support page to use Virtual Media function.
First click “Virtual Media” > “Connect Virtual Media”:

Then “Map CD/DVD”:

Choose a Linux ISO. I recommend Kali Linux Live ISO:

Then set “Next boot” to “Virtual CD/DVD/ISO”:

It will take some time (maybe 30 minutes) but it will end up booting Kali:

At this point you can hopefully mount the Windows filesystem, in my case it was possible using:
sudo mount /dev/sda2 /mnt/mount_windows
If it is only-read system I recommend to use samdump2 to dump SAM hashes with a command like this:
samdump2 /mnt/mount_windows/windows/system32/config/SYSTEM /mnt/mount_windows/windows/system32/config/SAM
If you can both read and write, it is also possible to execute the old Sticky Keys attack, replacing sethc.exe with cmd.exe.